As our world becomes increasingly digital, there is equally an increasing risk against personal privacy. Whenever we log into a website and establish a connection, information exchange occurs. This information ideally should be secured and not accessible by any unauthorized third party. To ensure that our connection is secured, we need to put in place a security mechanism to help encrypt our data exchanges. These security mechanisms come in the form of a secured HTTPS and an SSL (secure socket layer).
What is SSL?
SSL is an industry-standard security certificate (technology) used to establish an encrypted and secured link between server and browser. a secured link makes sure that all data being transmitted from server to web browser and vice versa remains protected devoid of any unauthorized access.
What is HTTPS?
HTTPS (hyper-text transfer protocol secure) is a secure version of HTTP which is the protocol through which data is exchanged between a browser and a website. In the TCP/IP protocol of data transmission, the SSL or TSL (transport layer security) acts as a sub-layer under the HTTP application layer. The goal of HTTPS is to serve as a form of shield for the data being transmitted between the web servers and browsers.
HOW TO ACTIVATE HTTPS ON YOUR TRULYWP SITE
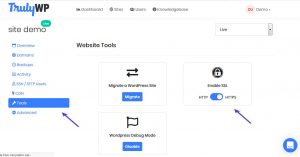
Step1: login to your Trulywp dashboard, on the top menu bar click on sites and select the site you want to manage.
Step2: click on the “tools; option on the left menu pane. Click to enable SSL in the list of options that appears next.
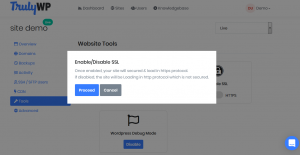
A prompt appears for you to select whether to proceed with the action or cancel.
Step3: In order for your migration from http to https to be successful, you must have at least one live domain pointed at TrulyWp.
HOW TO INSTALL SSL CERTIFICATE
For this article, we will be looking at three different options for installing an SSL (TSL) certificate on your WordPress site.
- Installing SSL/HTTPS in WordPress using a plugin
- installing SSL/HTTPS in WordPress manually
- Submit your HTTPS site to the google search console
Installing SSL/HTTPS in WordPress using a plugin
This method is easier and is recommended for beginners. For this method, you need to first install and activate the really simple SSL plugin. Once activated, go to your settings >> SSL page. This plugin will automatically detect your SSL certificate and will set up your WordPress site to use HTTPs.
Installing SSL/HTTPS in WordPress manually
This method involves manually editing your WordPress sites and troubleshooting issues. Manually updating SSL/HTTPS is a more optimized solution and requires a higher development skill.
Step1: to begin, on your WordPress dashboard, go to settings >> general page. In the general page, update your WordPress and site URL addresses in the fields provided by replacing HTTP with HTTPS as shown below:

After this click on the “save changes” button to save new settings. You will need to logout and login again to for these changes to take effect.
Step2: set up your WordPress redirect from HTTP to HTTPS by adding the following code to your .htaccess file.

If you are on nginx servers, you would need to add the code below to redirect from HTTP to HTTPS in your configuration file. Ensure you replace the example.com in the script below with your own domain name.

Submit your HTTPS site to the Google search console
Search engines like Google consider HTTP and HTTPS as different URLs. Hence the need to let Google know when your website has moved from HTTP to https to avoid any SEO issues.
Step1: go to your Google search console account and click on the “Add a property” button.
Step2: add your https site as a new property in the Google Search Console. Once this is done, a pop-up with fields where you can add your website’s new https address appears. See image below:
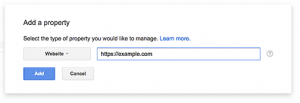
After that, you will be prompted to verify ownership of your website with different options to choose from. Select the method you prefer and follow the instructions to verify your site.
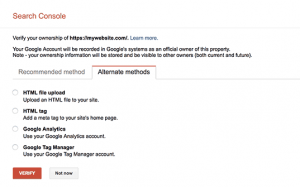
Once your site is verified, Google will start showing your search console reports. It is good practice to include both the HTTPS and HTTP versions of your website in your search console; as this notifies Google that you want the HTTPS version of your website to be treated as the primary version. After this is done, Google will transfer your search rankings to the https version of your website. This will improve your search rankings slightly.
